Tavronitis Bridge MTO (id:#56239)
(Revision: MMP: ASL 5a - For King and Country #93)
West of Maleme, Crete
1941-05-20 (49 others)
45: Revenge at Kastelli (ASL 6 - The Last Hurrah (2nd Edition))
93: Tavronitis Bridge (ASL 5a - For King and Country)
94: Bofors Bashing (ASL 5a - For King and Country)
95: Descent into Hell (ASL 5a - For King and Country)
97: A Desperate Affair (ASL 5a - For King and Country)
98: On Silent Wings (ASL 5a - For King and Country)
A 02: Bofors Bashing (AH:ASL Annual `89)
A 03: Descent into Hell (AH:ASL Annual `89)
A 102: On Silent Wings (AH:ASL Annual `96)
BB04: A Desperate Affair (Backblast # 1)
G39: A Desperate Affair (AH:The General # 31.4)
T15: The Akrotiri Peninsula (AH:The General # 29.1)
NEWS23: Plans Gone Astray (ASL News # 14)
PL G: Cemetery Hill (version 2.0) (Platoon Leader 2.0)
ASL News 23: Plans Gone Astray (Scroungin' ASL News)
O75.1: Crete 1: The Airfield (On All Fronts # 75)
O75.2: Crete 2: The Bridge (On All Fronts # 75)
O75.3: Crete 3: The Hill (On All Fronts # 75)
O75.4: Crete: Riders on the Storm CG (On All Fronts # 75)
DB009: Headhunting for Bloody Huns (Dispatches from the Bunker # 5)
CH 177: Akrotiri Gone Awry (Critical Hit # 7.3)
ASLSK Contest C: Thank Heavens, We Lost (ASL Starter Kit Scenario Designer Contest)
OM-1: Morning's Peril (Kreta - Operation Merkur)
OM-2: Glide Path to Hell (Kreta - Operation Merkur)
OM-3: Hill 107 (Kreta - Operation Merkur)
OM-4: The Umbrella Men (Kreta - Operation Merkur)
OM-5: Stentzler's Wary Reconnoitre (Kreta - Operation Merkur)
OM-6: Waltzing the Matildas (Kreta - Operation Merkur)
AoC01: Rushing Hill A (Kreta - Operation Merkur)
AoC10: Glide Path to Invasion (Kreta - Operation Merkur)
OM-CG: Kreta - Operation Merkur Campaign Game (Kreta - Operation Merkur)
45: Revenge at Kastelli (ASL 11 - Doomed Battalions (3rd Edition))
OB04: Headhunting for Bloody Huns (Out of the Bunker)
SAM 2: A Royal Escape (Swedish ASL Magazine)
RR-15: Koch's Rockets (Russian Rarities 2)
DB126: The Kastelli Thirteen (Dispatches from the Bunker #41)
: Expect the Cretans to be Friendly (View From the Trenches - Brit Pack)
MM 46: Take That Hill (March Madness 2018 Players Pack)
DB150: Fallschirmjäger Graveyard (Dispatches from the Bunker #48)
#1: Hand of Von Richtofen (The Devil's Vineyard: Heraklion Airfield)
#2: Into The Fire (The Devil's Vineyard: Heraklion Airfield)
#3: Befall, The Yellow Flowers (The Devil's Vineyard: Heraklion Airfield)
#8: Black Watch, Death Watch (The Devil's Vineyard: Heraklion Airfield)
D21: Headhunting For Bloody Huns (Deluxe Advanced Squad Leader)
FF20b: The Face of Battle (FireFights: internet releases)
J226: Drawing the Kroh (ASL Journal #14)
ASLN23: Plans Gone Astray (Critical Hit #8.1)
45: Revenge at Kastelli (ASL 11a - Doomed Battalions (4th Edition))
S104: Paratrooper's Hell (Basic Training: Issue One)
Designer: Steven Swann
Starter kit scenario?: Deluxe scenario?:
Balance:
GermanNew Zealand
Overview:
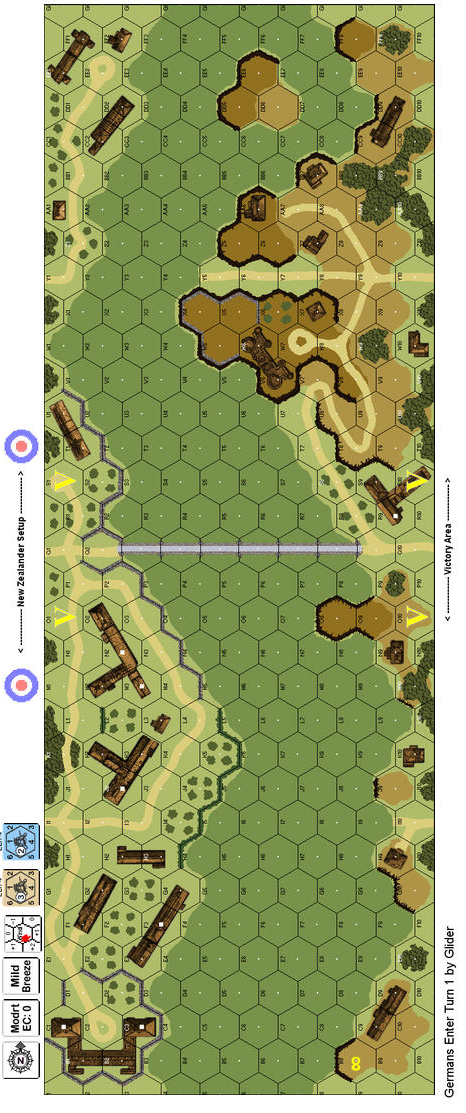
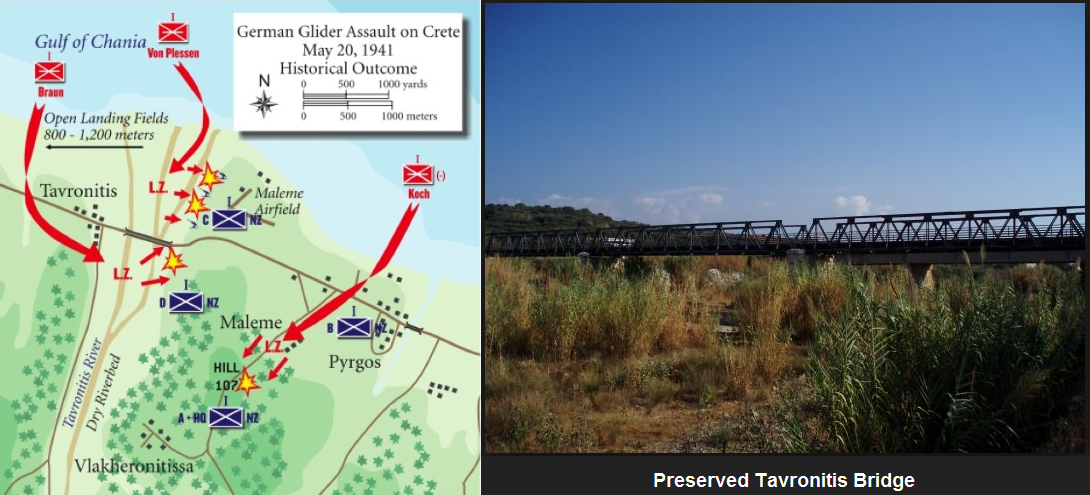
The airfield at Maleme figured prominently in the German plans for the capture of Crete. “Group West”. Commanded most of the 1st Assault Regiment under the command of General Meindl, consisted of three detachments: one to land at the Tavronitis Bridge; one to destroy the AA positions and ease the way for the following troop-carrier transports; and one to land on the slopes of Point 107, high ground to the south of the field. Major Braun drew the task of seizing and holding the long span over the dry Tavronitis. Given free rein to plan his assault, he decided to daringly land in the dry bed itself and then take the British MG posts which guarded each side of the bridge from the rear.Attacker: German (Abteilung Braun, Bataillon 1, Sturm Regiment 1)
Defender: New Zealand (D Company, 22nd New Zealand Battalion)
5.5 turns
Players: 2 OBA: None Night: No| Unit Counts: |
| Squads: A:10.0 D:5.0 |
| AFVs: A:0 |
| AFVs: D:0 |
| Guns: A:0 5cm leGrW 36 x 2 D:0 |
| Misc Rules: | DLV (F11.6), Olive Groves (B14.8). A: Gliders (E8) |
| Map Board(s): |
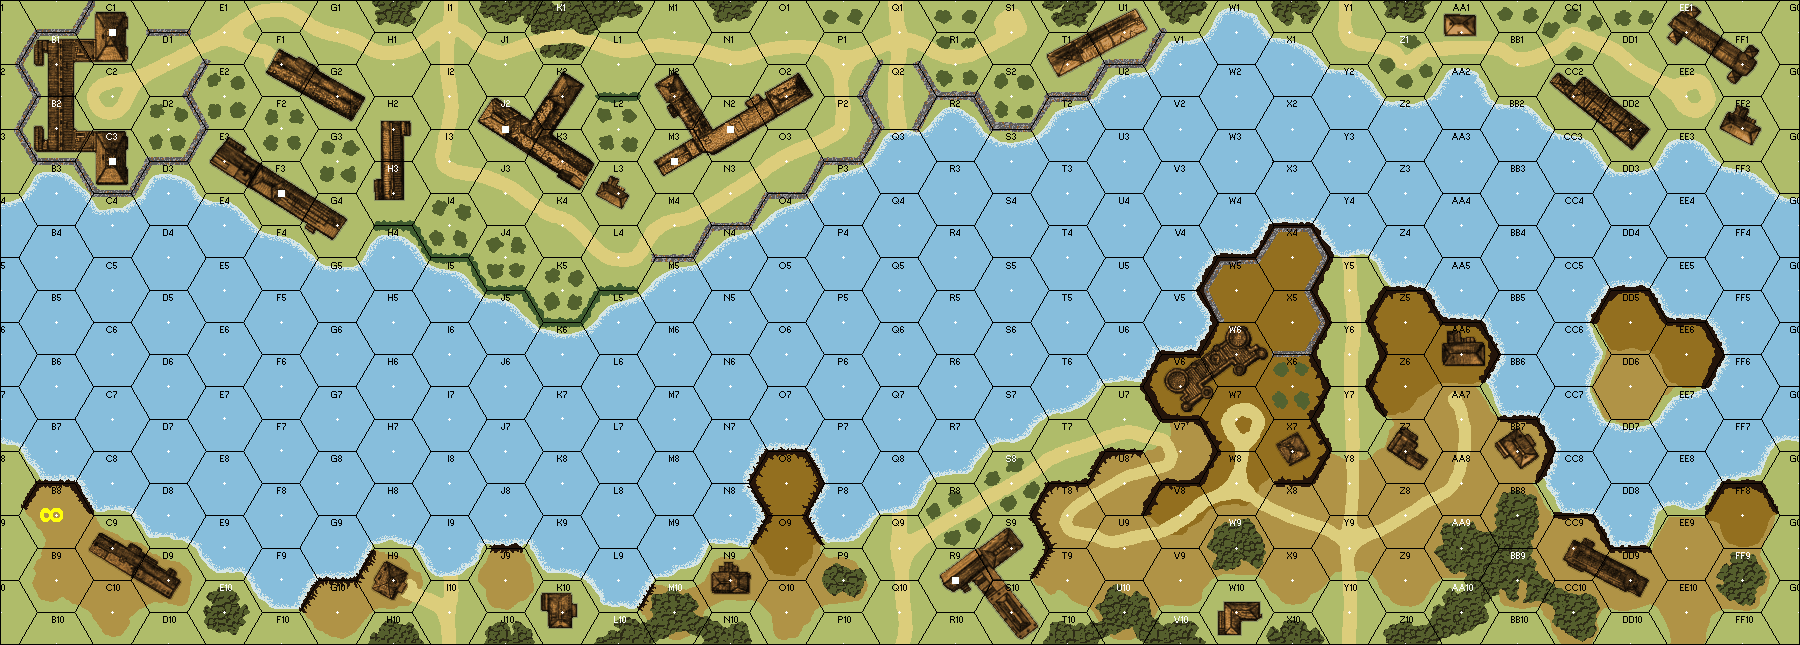
| Overlays: | NONE |
Errata (source)
| Add a 4-6-8 and a glider to the German OB. | MMP |
| In SSR 2, replace “Q2-Q9” with “Q3-Q8”. | J11 |
Players wanting to play this game/Request a match:
Scenario info
Last Played:
View all or balance report
| Action | Date |
|---|---|
| FMFCB Added a playing | 2026-04-22 17:27:40 |
| Hutch Modified the misc. rules | 2025-01-22 13:40:40 |
| hoxson1 Linked the scenario to ROAR | 2024-10-29 17:36:34 |
| hoxson1 Modified the unit counts | 2024-03-14 22:22:42 |
| Hutch Set the designer field | 2023-09-24 23:30:32 |
| File | Description | User | Views |
|---|---|---|---|
| (Tavronitis.png) | Image | hoxson1 | 2326 |
| German glider as seen from bridge (tavronitis germ glider.png) | Image | hoxson1 | 1927 |
| (germ-nzealand.png) | Image | hoxson1 | 1451 |
| (a1 map N correct.png) | Map Image | hoxson1 | 1572 |
| Description | Uploaded by |
|---|---|
| Scenario's Everyone Should Play Once #1 | Panzer |
| Title | Author | Date |
|---|
| Description | Uploaded by |
|---|
Quick Map View
Location
Images
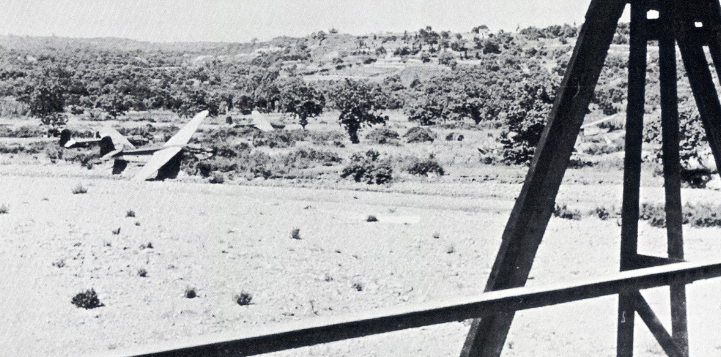
German glider as seen from bridge
| Statistics: | ||
| Avg Rating: 6.71 | Votes: 14 | Views: | 18117 |
| To-Play list count: | 11 | |
| Estimated Play time: | 1.9 hours | |
| Recorded Games: | 9 | |
| Archive recorded plays: | ||
| German | 3 | |
| New Zealand | 6 | |
| Drawn: | 0 | |
| ROAR Data: (as of today) Tavronitis Bridge [Confirmed] |
| [A] German | 28 |
| [D] British | 49 |