Merely Hanging On WTO (id:#60488)
St. Mère Église, France
1944-06-07 (63 others)
12: Confusion Reigns (ASL 2 - Paratrooper (2nd Edition))
16: No Better Spot to Die (ASL 2 - Paratrooper (2nd Edition))
27: The Liberation of Tulle (ASL 4 - Partisan!)
103: A Day By the Shore (ASL 5a - For King and Country)
A 47: White Tigers (AH:ASL Annual `92)
A 77: Hide & Seek (AH:ASL Annual `95 Winter)
G22: A Day By the Shore (AH:The General # 29.4)
G42: The Youth's First Blood (AH:The General # 31.6)
S01: Retaking Vierville (ASL Starter Kit #1)
NEWS11: The Port-Filliolet Crossroad (ASL News # 6)
SB 1: You Want to Save Private Ryan? (Internet)
ABS-4: No Better Place To Die... (Airborne Stand!)
AA 4: A Better Spot Than This (All American I: Kellam's Bridge)
AA 14: North Rampart - Fire! (All American II: Timmes' Orchard)
AA 23: Lost Battalions (All American III: Shanley's Hill)
AAGG3: Historical The Port-Filliolet Crossroad (All American: Gamers Guide)
CH148: Trapped at Authie (Reissue) (Critical Hit # 6.4)
CH 1: Authie: The Death of Company C (Critical Hit # 1)
EP11: The Port-Filliolet Crossroad (Euro-Pack III - Late War `44-45)
PdH 5: Rangers Relief (Pointe Du Hoc)
BTB2: Merely Hanging On (Beyond the Beachhead)
O82.1: Armor Leader: Normandy CG (On All Fronts # 82)
PJ7.1: Mines! (OAF Playtester's Journal # 7)
#9: Le Mesnil Strongpoint (To Battle By Air 2)
#4: Dead Man's Corner (To Battle By Air 1)
VB15: One-Man Wrecking Machine (Volfoni Brothers Scenarios)
AP30: Not Apt to Drag Feet (ASL Action Pack # 4 Normandy 1944)
RPT24: Farmyard Affray (Rally Point # 3)
SP170: Halfhearted Hiwis (Schwerpunkt #15)
ESG #53: "Mad Mike's" Part Two (Dezign Pak 5)
MLR08: Prelude to Disaster (Elite Canadians)
MLR09: Overrun (Elite Canadians)
BOB # 6: Sink's Orders (BoB - Normandy)
BOB # 7: Tense Moments (BoB - Normandy)
JDJ 1.1: Retaking Vierville (Coastal Fortress)
159: White Tigers (ASL 13 - Rising Sun)
BAA 7: Tip Of The Spear (The Battle for the Abbaye des Ardennes)
KB II 4: No Better Place to Die... (All American I: Kellam’s Bridge (2nd Ed.))
CH1: Authie: The Death of Company C (Critical Hit Retro Magazine 1)
12: Confusion Reigns (ASL 3a - Yanks (2nd Edition))
16: No Better Spot to Die (ASL 3a - Yanks (2nd Edition))
RPT115: Halfhearted Hiwis (Rally Point #12)
S16-16: Pointmen of Authie (Sweet 16 4-Pack 4)
Round 2: Prelude to Disaster (ANZACon 2005)
27: The Liberation of Tulle (ASL 12 - Armies of Oblivion (2nd Edition))
PEB #1: Along The Way (Port-en-Bessin)
PEB #2: Confused Street Fight (Port-en-Bessin)
PEB #3: Clear Them Out: WN 57 (Port-en-Bessin)
PEB #4: B Troop Arrives (Port-en-Bessin)
PEB #5: Zig Zag 1 (Port-en-Bessin)
PEB #6: DSO Riposte (Port-en-Bessin)
PEB #7: Stutzpunkt Port-en-Bessin (Port-en-Bessin)
PdH #5: Stars and Stripes Forever (Pointe Du Hoc: Retro Bar Gunner Edition)
#8: Raff's Rush (Utah Beach)
159: White Tigers (ASL 13 - Rising Sun (2021))
CH 1: Authie: The Death of Company C (Critical Hit #1 2022 Reprint)
SM10: Not Apt to Drag Feet (HASL 12a - Drop Zone: Sainte-Mère-Église)
SM07: One-Man Wrecking Machine (HASL 12a - Drop Zone: Sainte-Mère-Église)
SM08: Without Thought of Numbers (HASL 12a - Drop Zone: Sainte-Mère-Église)
SM09: Confusion Reigns (HASL 12a - Drop Zone: Sainte-Mère-Église)
SM CG II: Liberation Road (HASL 12a - Drop Zone: Sainte-Mère-Église)
ASLN11: The Port-Filliolet Crossroad (Critical Hit #8.1)
FT75: Unexpected Fire (From The Cellar Pack #13)
Designer: Chas Smith
Starter kit scenario?: Deluxe scenario?:
Balance:
GermanAmerican
Overview:
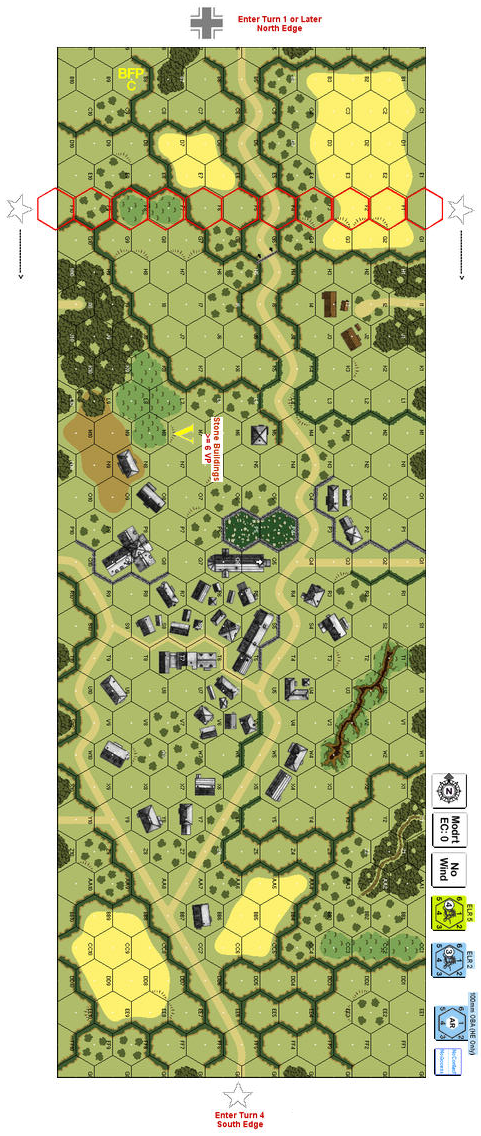
General von Schlieben was determined to stop the invasion in his sector, and to do so had to retake St. Mère Église, currently held by elements of the U.S. 82nd Airborne Division. The 1058 Regiment of the 91 Airlanding Division was committed on 6 June to retake the village, and moved south from the beachhead area. The grenadiers had to fight against scattered defenders through the hedgerows and were only able to gain Neuville, several kilometers north of St. Mère Église. They would continue the attack the following morning, and were reinforced by several artillery units, Army Sturm Battalion 7 and Panzerjaeger Battalion 709.Attacker: German (Grenadier Regiment 1058, Army Sturm Battalion 7 and Panzerjaeger Battalion 709)
Defender: American (505th Parachute Infantry Regiment, 82nd Airborne Division and Company B, 746th Tank Battalion)
8 turns
Players: 2 OBA: German Night: No| Unit Counts: |
| Squads: A:16.0 D:10.0 |
| AFVs: A:4 GSW 39H(f) PaK x 4 |
| AFVs: D:3 M4 x 2 M4(105) |
| Guns: A:0 D:1 M1 57mm AT Gun |
| Misc Rules: | BtB HBR. D: US 6-6-7/3-4-7s have underlined morale |
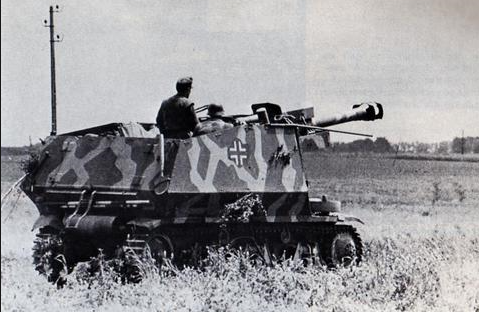
| Map Board(s): |

| Overlays: | NONE |
Errata (source)
| German OB: The tank destroyer is the GSW39HPak with 75L (German Vehicle Note 103). | HoB |
| The VC in the 2022 edition were inadvertently changed. The 2022 edition does not specify stone buildings for the VC. As confirmed by the designer, the VC are *stone* building control. | Designer |
Players wanting to play this game/Request a match:
Scenario info
Last Played:
View all or balance report
| Action | Date |
|---|---|
| Hutch Modified the gps location | 2025-08-22 19:02:12 |
| Hutch Modified the location | 2025-08-22 18:59:32 |
| Hutch Modified the Unit Elements | 2025-08-22 18:58:17 |
| CloseAssaultPete Added a playing | 2025-02-07 12:10:30 |
| hoxson1 Modified the gps location | 2024-02-07 17:30:35 |
| File | Description | User | Views |
|---|---|---|---|
| GSW 39H(f) PaK (GSW H39f marder I.png) | Image | hoxson1 | 1825 |
| (!germ-usa.png) | Image | hoxson1 | 1699 |
| (BtB2-Map.png) | Map Image | bkemp01 | 1932 |
| (BtB2-Map.png) | Map Image | bkemp01 | 1996 |
| Updated VASL Map (A.jpg) | Map Image | Fre20741 | 2037 |
| (merely hanging N.png) | Map Image | hoxson1 | 1677 |
| Description | Uploaded by |
|---|
| Title | Author | Date |
|---|---|---|
| Errata for 2022 Edition (view) | Ibncalb | 2023-03-05 10:09:03 |
| Description | Uploaded by |
|---|
Quick Map View
Location
Images

GSW 39H(f) PaK
| Statistics: | ||
| Avg Rating: 5.63 | Votes: 16 | Views: | 7713 |
| To-Play list count: | 2 | |
| Estimated Play time: | 7.7 hours | |
| Recorded Games: | 7 | |
| Archive recorded plays: | ||
| German | 3 | |
| American | 4 | |
| Drawn: | 0 | |
| ROAR Data: (as of today) Merely Hanging On [Log in to Confirm or Edit] |
| [A] German | 16 |
| [D] American | 27 |